Nets (NYTEK23)
Manuals
Nets (NYTEK23)
Table of Contents
Important information is marked with the following symbols:

1 Summary with an overview of the component and key points related to escape prevention
1.1 General definitions
| Aquaculture farm | Installation for the farming of fish. |
| Basin dimensions | The pen’s inner circumference. |
| Net mending | Repair of holes in the netting by making new meshes to replace the ones that are broken. |
| Design working life | Assumed period for which a structure or part of it is to be used for its intended purpose with anticipated maintenance but without major repair being necessary. |
| Operation | Fish farming at site, including all installation and operation activities performed at the site while fish farming is in progress, and that are of relevance to the escape prevention of fish. |
| Depth net side | Vertical depth measured from the main rope to the bottom rope. |
| Depth center of net | Vertical depth measured from the main rope to the deepest point in the center in a suspended net. |
| Dead fish collector / Mortality handling system | Tool for removing dead fish from the bottom of the net. |
| Extra equipment | Equipment that is not a main component. |
| Inspection | Systematic inspection/examination, usually visual, to ensure that the equipment satisfies the requirements. |
| Floating collar | Structure whose main function is to provide an enclosure with buoyancy and/or stiffness. |
| Half mesh | The distance between two adjacent knots in a mesh. |
| Main component | Part of an aquaculture farm that holds one or more of the installation’s load-bearing main functions. Example: Floating collar, anchoring/mooring system, raft and enclosure. |
| Impregnation/coating | Chemicals used to extend the lifetime of the net through protection and reduction of fouling. |
| Bracket | Component keeping the inner and outer floating collar pipes together. |
| Weight | Weight or other device attached to the net to achieve the intended shape. Centre weight is attached beneath the net-cone. |
| Mesh opening | Internal distance between two opposite knots/joints in a mesh when stretched out in the production direction.  |
| Full mesh length | The distance between the center of two opposite knots/joints in a mesh when stretched out in the production direction.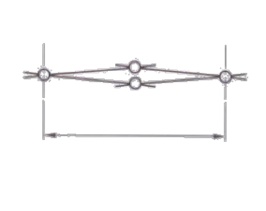 |
| Cage | Floating structure with enclosure. |
| NS9415:2021 | Standard which sets out functional requirements for floating aquaculture farms and will be fundamental for stakeholders in the aquaculture industry, such as authorities, supervisory bodies, designers, suppliers, actors within R&D and manufacturers, as well as aquaculture farm owners. |
| NYTEK23-regulation | Governing Regulation for Fish Farming in Norway. |
| Circumference | Daylight opening/inner face of pipe of the inner floating collar. |
| Product certificate | Document confirming that the net is produced in accordance with requirements in NYTEK23 and NS9415:2021. |
| Service card | Document verifying that the net is maintained, controlled and approved in accordance with NYTEK23 and NS9425:2021. |
| Solidity | Ratio between the planned netting area and total area of a net panel. |
| Suspension system | Weight, sinker tube or similar used to keep the cylindrical three-dimensional shape of the net. |
| Load bearing system | Framework consisting of steel rods and chains connecting all the brackets on the floating collar, which ensures structural integrity of the pen and distribution of the forces acting on the pen to the entire structure. |
1.2 Introduction
The net primarily consists of netting and ropes. The ropes form the framework, where all loads applied to the net are absorbed by the ropes. All ropes have a function, and be aware that not all ropes are designed to handle all types of loads. Correct assembly and assembly sequence are critical to avoid potential wear and tear that could lead to fish escape.
For each net produced by ScaleAQ, a technical drawing will be prepared. The video below shows the main components for a Midgard(c) net.
The assembly, use, inspection, and maintenance of the net are essential for ensuring control over escape safety. These aspects are covered in the following chapters.
2 Description of the net and its components
2.1 Definitions
| Splicing | Series of stiches. |
| Bottom loop | Loop mounted on the bottom rope. Only bottom loops mounted at cross ropes/lifting ropes can be used for lifting or suspension of the net. |
| Bottom rope | Horizontal rope at the transition between the sides and the bottom cone of the net. |
| Double line / reinforcement section | Extra netting mounted at specific locations on the net to protect against abrasion or similar damage. |
| Dead fish pocket | Pocket mounted at the center, bottom of the net for adaptation to the dead fish removal system. |
| Tapering | Seam for joining rope and netting. |
| Stitching rope | Rope being part of the net’s construction and is stitched to the netting. |
| Jump catch net | Part of the net placed between top rope and main rope. |
| Main rope | Horizontal structural element located under the top rope, where the net is attached to the pen. |
| Hoist rope | Rope for mounting and lifting the dead fish net. |
| ID label | Permanently attached label with information about the net. |
| Attachment loop | Loop mounted on the main rope and will be used for attaching the net to the pen. |
| Connection rope/umbilical cord | Rope mounted between the center of the outer bottom and the inner bottom (false bottom). |
| Cross rope | Continuation of a vertical rope that on its own or together with others crosses the bottom of the opposite vertical rope. Cross rope in ScaleAQ Midgard net is a continuation of the lifting ropes. |
| Plumb | Weight or other device attached directly or indirectly to an enclosure in order to stretch it. |
| Lifting rope | Vertical rope that continues as cross rope at the bottom of the net. |
| Waist rope | Horizontal rope placed below the main rope at various depths. Multiple waist ropes can be mounted on the net. |
| Midgard-system | System where the load from the net waist rope is transferred to the center of the floating collar brackets, thus ensuring equilibrium. |
| Netting | Meshed structure made from textile material. |
| Hauling rope | Loose rope on the outside or inside of the net, attached to a loop at the bottom rope and follows the lifting rope. |
| Gyro | Ring in the bottom center of the net. |
| Vertical rope | Vertical rope in the net. |
| Top loop | Loop on the top rope. |
| Top rope | Uppermost horizontal rope on the net. |
2.2 Designations
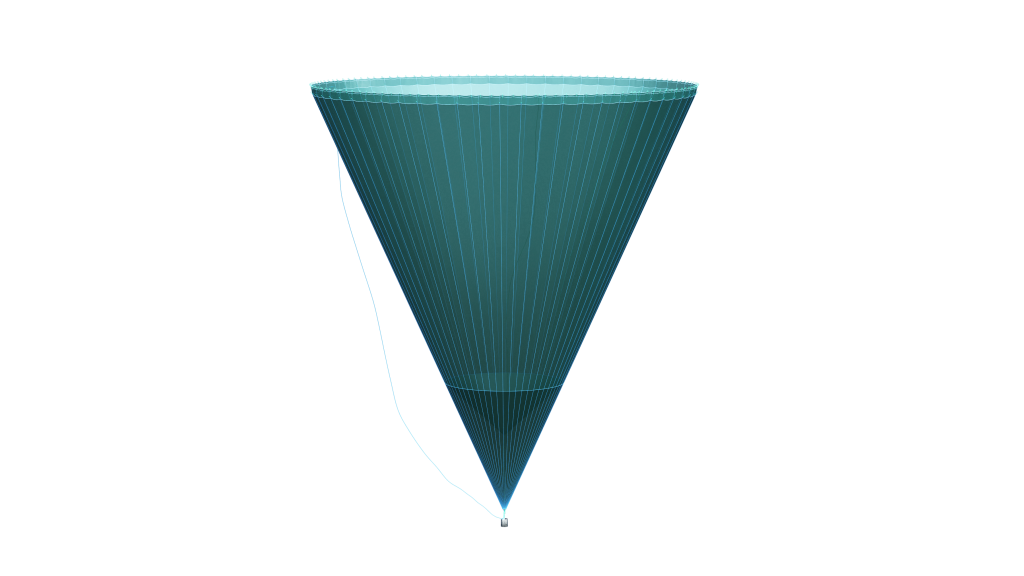
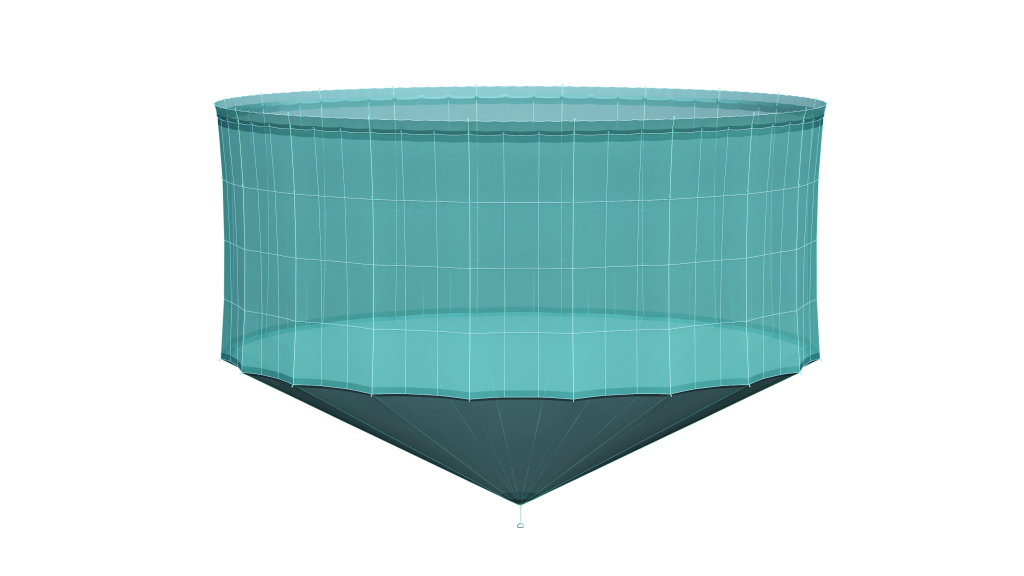
ScaleAQ applies the following classifications for the most frequently used net constructions:

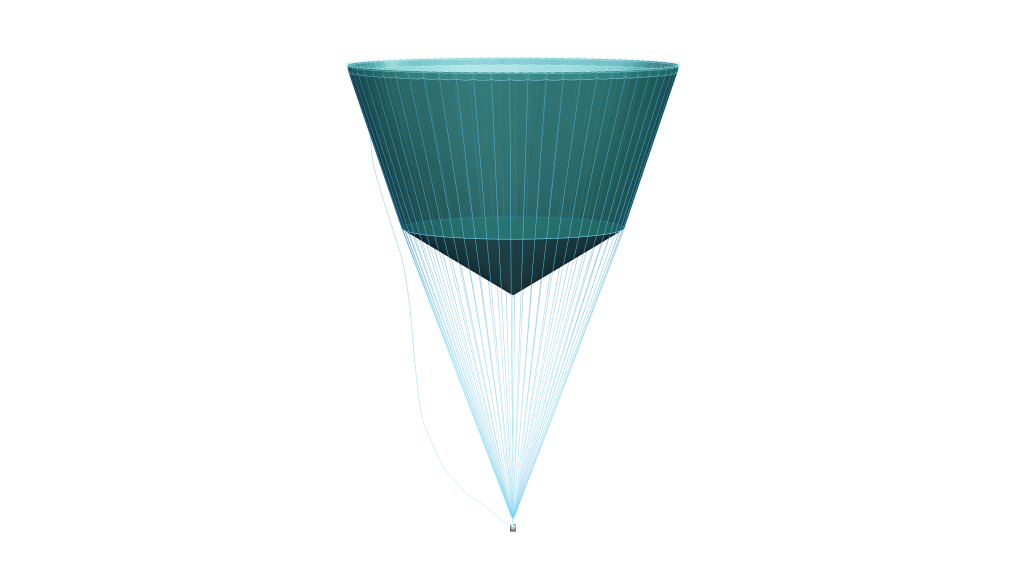
2.3 Mesh size and material types
The net is composed of netting and ropes. ScaleAQ offers several types of netting materials with various properties, which can be used for aquaculture. These are the following:
- Nylon
- Polyester
- HDPE
- UHMWPE (ScaleAQ Ultra)
- Ultima
These types of netting can also be combined in a single net.
Nylon is considered the ‘standard netting’ and is the most commonly used material in nets for aquaculture. Nylon may be treated with either impregnation or coating to reduce fouling and facilitate easier maintenance/cleaning.
Nylon is available as both knotted and knotless netting.
Polyester has a higher density than nylon but offers several advantages, such as good UV resistance, better shape stability, and less shrinkage than nylon. Polyester nets are treated with either impregnation or coating to reduce fouling and make maintenance/cleaning easier.
Polyester is available as both knotted and knotless netting.
HDPE has been tested under extreme conditions and shows excellent properties in terms of tensile strength and abrasion resistance. HDPE netting withstands frequent cleaning and is an environmentally friendly option since impregnation is not necessary.
HDPE is available as both knotted and knotless netting.
UHMWPE (Ultra High Molecular Weight Polyethylene) is a robust and strong netting material with high tensile strength relative to thread thickness.
UHMWPE is available as both knotted and knotless netting.
Ultima is a combination of a polyester core (for sinking ability) and an outer layer of HDPE for abrasion resistance. This netting provides an excellent combination of tensile strength and abrasion resistance. It also has good sinking ability in water.
Ultima is available as knotted netting.
2.4 Assumptions and limitations

The net should only be used at locations for which it is approved. The dimensions of the net are specified in the net’s certificate.
The holder of the aquaculture license is responsible for the interface and dimensioning of these in relation to the applicable net according to the requirements in NS9415:2021. This applies to both main components and additional equipment.
2.4.1 Specific requirements for pens when using ScaleAQ Midgard net

The ScaleAQ Midgard net should only be used on pens designed for mounting the Midgard suspension in brackets between the floating collars on the pen.
3 Interaction with other components
The net should be designed for interaction and compatibility with other main components and extra equipment. Similarly, suppliers of adjacent main components and extra equipment must design their equipment to integrate with the specific net.
3.1 Interaction with pens
Nets provided by ScaleAQ are designed to document compatibility with the relevant/approved pen. The product certificate for the net presents essential information on compatibility and the limitations of use with the pen.
3.2 Interaction with the spreading system
ScaleAQ nets are designed to document compatibility with weighting and spreading systems. The net’s product certificate provides essential information about compatibility and the limitations of using the net with weighting and spreading systems.
3.3 Interaction with permanent extra equipment
When using permanent extra equipment in the net that affects integrity and response behavior, ScaleAQ should be contacted for advice and approval.
3.4 Interaction with temporary extra equipment
When using temporary extra equipment in the net that affects integrity and response behavior, ScaleAQ should be contacted for advice and approval.
3.5 Interaction with dead fish collection systems
ScaleAQ nets can be used with most dead fish collection systems. Special dead fish socks (pockets) are also installed for easier and safer installation of the dead fish collection system at the bottom of the net.
The supplier of the dead fish collection system must provide documentation that accounts for compatibility with the net.
ScaleAQ should be contacted if there is any uncertainty regarding compatibility.
4 Installation of the net
The net should be mounted in a controlled manner, using lifting equipment correctly sized for the dimensions of the net.
The net should be lifted by the loops on the lifting ropes and/or by using straps around the net. When using straps, they must be applied in a way that does not damage the net. Using a choke loop/slip knot for lifting is not recommended. Preferably, use a U-lift or wrap the strap around the net two or more times.
Mounting and replacement of the net should be conducted in good weather conditions. This must be documented in the Safe Job Analysis (SJA).
4.1 Documentation check – pre-installation checklist

The user must ensure that all documentation (product certificate, service card, user manual) is available and corresponds to the identification number of the net before use. Check that the net is designed for the wave and current conditions at the site. The net’s limit values are specified in its certificate. It is the user’s responsibility to ensure the net has the correct dimension class according to NS 9415:2021.
Inspect the packaging for damage. Visible damage to the packaging may indicate that the net has been affected during transport or storage. In such cases, the net should be thoroughly checked.
ScaleAQ requires that personnel have the necessary expertise when installing the net. The holder of the aquaculture license must ensure that competency requirements are specified and maintained.
4.2 General procedure – installation of the net
The installation procedure for the net may vary depending on size, availability of equipment and personnel, as well as the user’s routines and experience. Nets are normally packed with the pointed end at bottom and the upper part at the top.
- Start by lifting the bottom part of the net. The center of the bottom is secured to the vessel or the pen during installation.
- Continue lifting the rest of the net over the side until only the upper part remains.
- Attach the first loop to the pen. If the cage includes a spreading system like a bottom ring or similar, the first attachment loop should be at the lifting rope.
- Secure attachment loops to the pen as the net is positioned along the pen. Continue until approximately half the circumference of the pen is covered, leaving the net folded.
- Pull the rest of the net over to the opposite side and fasten the remaining attachment loops. Buoys attached to the top of the net can prevent it from sinking.
- The attachment loops from the main rope should not be mounted too high to prevent the loop and knot from rubbing against the pen.
- Ensure the jump net is tensioned but not bearing any loads. Make sure the top rope does not touch the hooks on the inside of the handrail posts to avoid wear on the top rope.
4.3 Important considerations for installing the ScaleAQ Midgard© net
ScaleAQ Midgard© nets are designed in accordance with ScaleAQ’s trademark standards for this type of net, as the sole provider in the aquaculture industry.
The following guidelines should be followed when installing the ScaleAQ Midgard© net:
- The main attachment to the pen is via the Midgard suspension from the first waist rope with a lifting eye. The suspension is connected to a chain with a 2-ton round sling (length 0.5m).
- To ease the installation and removal of the net, a rope (approximately 4m long) is attached to the top of the Midgard suspension. When the Midgard suspension is slack, this rope can be used to lift the top of the suspension to the surface.
- Adjust the chain where the Midgard suspension is attached so the lifting eye of the net can be pulled into the base of the post by hand.
- Note! Regardless of the rope dimension chosen for attaching the net to other components, this rope should have a lower breaking strength than the net’s attachment point.
- Correct loop placement on the main rope is shown in Figure 4.1 below. Ensure the loop is not positioned too high to avoid friction on the main rope and netting.
- Attachment rope between the main rope and the floating collar: Length and dimensions must be adjusted to the net and floating collar. Use an appropriate and secure knot on the attachment rope.
- Spreading system is attached to the attachment loop on the bottom rope in line with the lifting rope.
- The spreading system should be attached in a way that avoids friction against the net.
- The Midgard suspension should bear the main load. This is adjusted by tightening/slackening the chain where the Midgard suspension is attached. All chains for the Midgard suspensions around the floating collar should have an equal number of chain links from the top to the loop where the service pin is inserted.
- The sinker tube suspension, when using the Midgard© system, should have a minimum of 70cm of slack during daily operations. Secure this point correctly with a shackle attached to the end of either a rope or chain extension on the sinker tube suspension. See Figure 4.10.

4.4 Attachment of net to pen
4.4.1 Attachment by using rope
- The rope or equivalent attachment between the main net rope and the pen must always have a lower breaking strength than the net’s attachment point.
- Attachment must be performed at the bottom part of the handrail post.
- Recommended attachment methods of main rope to steel brackets and plastic brackets are shown in Figure 4.2-4.4. Length and dimensions should be adapted to the net and pen.


4.4.2 Attachment by using quick net coupling and strap
ScaleAQ has developed a quick coupling for attaching loops on the main rope in the net to brackets on the pen. A round sling or fiber sling should be used between the quick coupling and the eye on the main rope. The quick coupling should only be used on brackets having an inner fender installed.
- The round sling is threaded down onto the pipe on the lower part of the quick coupling.
- The sling is then threaded through the eye of the main rope on the net and threaded down onto the pipe on the lower part of the quick coupling.
- The pipe on the upper part of the quick coupling is then lowered into the lower part of the quick coupling.
- The quick coupling is locked with a cotter pin or plastic-coated steel wire through the hole in the pin.
- The length of the round sling when installed (double folded) should not exceed 15 cm.

4.5 Attachment between net and suspension system (sinker tube)
The attachment of the net to the suspension system should only be done using the attachment loops on the bottom rope or the Hs3+ connection point that continues from the lifting rope (where the lifting rope continues as cross rope).
The sinker tube should be designed for use with the specific net.
The net’s certificate contains information about the approved spreading system based on design specifications.
The suspension system must be installed in such a way that it does not cause chafing on the net.
4.5.1 Mounting and dimensions of sinker tube attachment rope
The sinker tube attachment rope is attached/choked between the net’s bottom rope or the Hs3+ connection point and sinker tube bracket with U-bolt, chain loop or Y-strap.
Dimensions of sinker tube attachment rope:
- Maximum distance from the net loop (Hs3+ connection point), rope ring or round sling to attachment of the sinker tube is 4,0 meters.
- Minimum distance from the net loop (Hs3+ connection point), rope ring or round sling to attachment of the sinker tube is 4,0 meters.
Ensure equal spacing and even load distribution on all attachment points between the net and sinker tube (suspension system).
NB! The dimension of the sinker tube attachment rope must be smaller than the dimension of the net loop/ear.
Example where ScaleAQ supplies sinker tube and net: Minimum 22 mm 3-strand rope with 7 tons MBL as sinker tube attachment rope must be used when the net loop/ear is 24 mm or more.
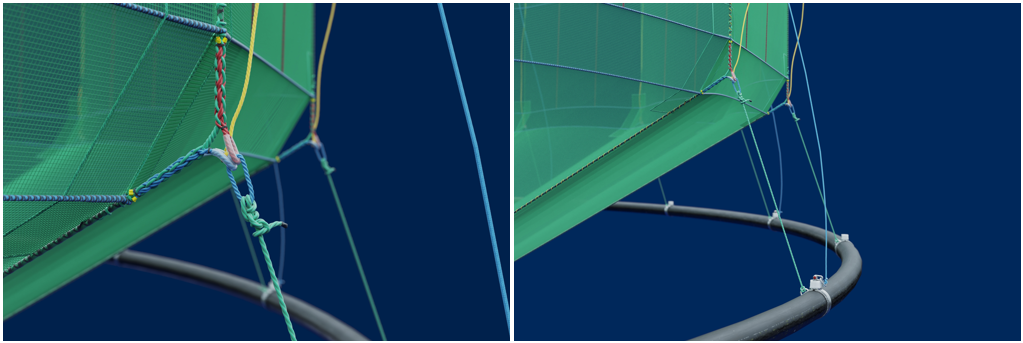
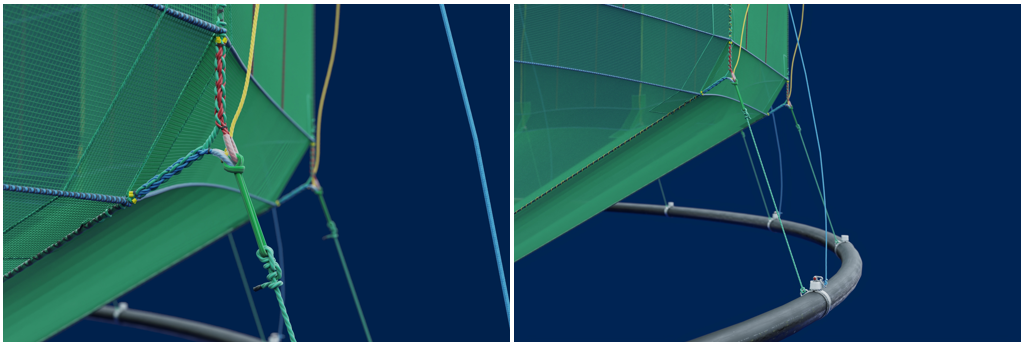
4.5.2 Attachment of net to sinker tube with Y-strap and stoppers
The net can also be attached to the sinker tube with Y-strap and stoppers as visualised in Figure 4.8.

4.6 Attachment of jump net
Two attachment ropes are evenly distributed between each handrail post, 10-12 mm rope as shown in Figure 4.9. Quick straps may also be used. Breaking strength and design loads should then be assessed in relation to the use of 10-12 mm rope.
Ensure there is some slack between the main rope and top rope to prevent the handrail from bearing any loads.
Make sure the top rope does not touch the hooks on the inside of the handrail posts to avoid wear on the top rope.

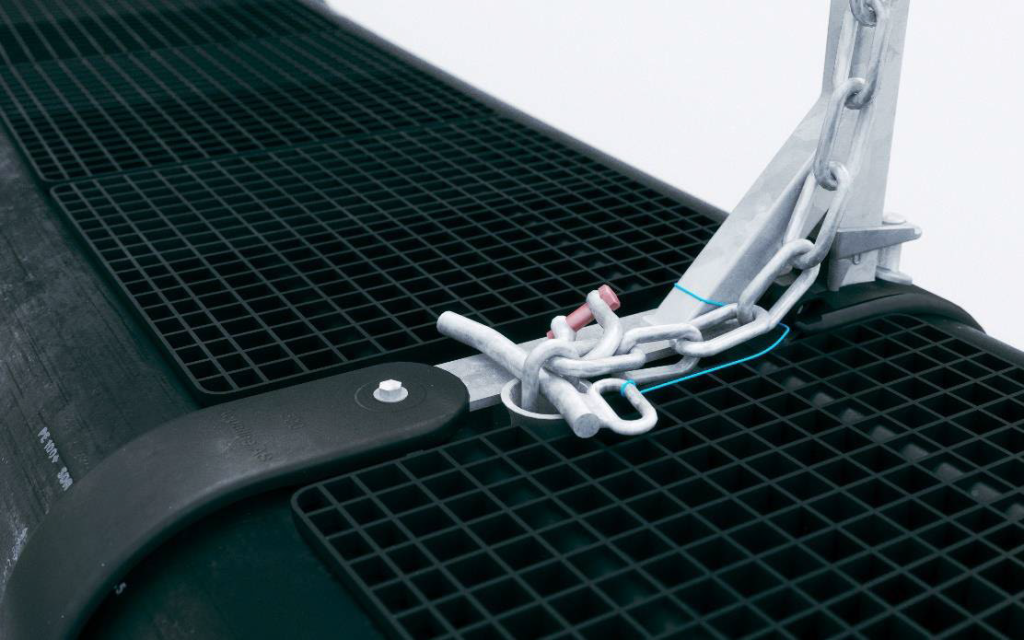
4.7 Securing sinker tube suspension to the pen with standard net
When using a standard net, where rope attachments are not designed to bear the load from the sinker tube, the load is distributed to the sinker tube suspensions. In this setup, a double securing of the suspension must be performed by using either:
- a service pin (thick) + shackle
- a shackle + shackle (both a 4.75-ton trawl pin and a 6.5-ton H-shackle are approved).
Double securing is achieved by placing a shackle (secondary securing) in the first available chain link above the link with the thick service pin or shackle (primary securing). See Figure 4.10.
4.8 Use of sliding blocks
Sliding blocks must be designed for their intended purpose.
Sliding blocks are attached between the sinker tube and the attachment loops on the bottom rope. The rope’s breaking strength must be lower than the breaking strength of the attachment loop on the net. Additionally, the length of the rope must be adjusted to fit the net being used.
Care must be taken to ensure that the sliding blocks do not touch sinker tube clamps.
5 Installation at site
5.1 Lifting
The net must always be lifted carefully and in a controlled manner to ensure personnel safety and to avoid damage to the net or other equipment. Only approved lifting straps and other lifting equipment should be used to position the net. When lifting bags or big bags, the loops on the bag must be inspected before the lift begins.
5.2 Additional equipment needed for installing the net
The weight of the net is large. Therefore, one or more service vessels with sufficient crane capacity must be used during installation. It is also recommended to plan the operation using a capstan or winch to pull the net into position. Fish farmers must have proper routines in place to avoid high-risk operations.
5.3 Inspection after installation
It is critical that the net is inspected after installation.

ScaleAQ recommends a general visual inspection of the external part of the net pen following installation. This inspection should focus on the following points:
- Interface with pen
- Interface with the tensioning system
- Knot points for rope connections
- Wear, damage, and holes in the net
6 Use
6.1 Docking and mooring of vessels
- When vessels approach the site at sea, it must be ensured that the net is correctly tensioned and that the vessel docks in a way that prevents any contact with the net.
- During loading and unloading of fish, care must be taken to ensure that the vessel or its mooring does not damage the net, and that no equipment that might harm the net is used. All direct contact between the net and the vessel or its equipment should be avoided.
- For each docking, it should be assessed whether weather conditions are favorable enough, whether additional tensioning is required, or if docking should be postponed until conditions improve.
6.2 Handling of dead fish
- To ensure the optimal functioning of dead fish collection, it is important that the net is correctly attached to the floating collar and properly tensioned. This ensures the net, especially the bottom, is stretched out without folds or creases in ropes or netting. Such a setup is essential for dead fish to accumulate at the center of the bottom, allowing efficient handling of dead fish.
- The user must establish good routines for monitoring the fish and for removing dead fish. Dead fish removal should take place daily.
6.2.1 Critical amount of dead fish
Theoretical capacity for the critical amount of dead fish per cross rope:
Assumptions:
- The cross rope is the load-bearing element in the bottom
- Safety factor for the rope material: 2.0
- The weight of the dead fish is evenly distributed across the bottom
- The weight of dead fish is supported by half of the cross ropes
- The weight of dead fish in water is 10% of its weight in air
| Dim [mm] | Breaking strength [kg] | Critical amount of dead fish per cross rope. Weight in water [kg] | Weight in air [kg] |
| 20 | 5800 | 1450 | 14500 |
| 24 | 8130 | 2033 | 20330 |
| 26 | 9410 | 2353 | 23530 |
| 28 | 10700 | 2675 | 26750 |
| 30 | 12200 | 3050 | 30500 |
| 32 | 13500 | 3375 | 33750 |
To determine the net’s capacity for the critical amount of dead fish, multiply the “Critical amount of dead fish per cross rope” by half the total number of cross ropes in the net. The number and dimensions of the cross ropes can be found in the certificate and drawings of the net.
Example:
- Number of cross ropes: 20
- Cross rope dimension: 30 mm
Critical amount of dead fish = 10 cross ropes x 3 050 kg = 30 500 kg (weight in water). In air, this corresponds to:
30 500 kg x 10 = 305 000 kg
This represents the critical amount of dead fish for the net. The critical amount of dead fish must not exceed the remaining buoyancy of the floating collar.
6.3 Mesh size for fish stocking
The fish farmer must have documentation of the average size and size distribution of the fish being stocked in the net. The maximum mesh size must comply with regulatory requirements concerning the size of the fish being stocked.
| Mesh opening [mm] | 30.7 | 38.5 | 40.7 | 45.7 | 49.2 | 54.4 |
| Recommended minimum fish weight [gram] | 25 | 56 | 87 | 129 | 195 | 250 |
6.4 Loading and unloading of living fish
Handling of nets should only be carried out under favorable weather conditions, considering wind, current, and wave height. Handling nets in strong currents should only occur in emergencies and with great caution.
6.5 Handling of the net
- When lifting the net, it must be handled gently to avoid damage.
- When raising/drying the net, it should only be lifted by the lifting ropes. Raising/drying using side ropes that are not lifting ropes should only be done as a tightening measure, ensuring minimal strain on the netting.
- It is crucial to handle the raising/drying of the net pen as gently as possible. We recommend raising the net in several stages to avoid excessive point loads on the net.
- Lifting and lowering of the net must be done using the loops on the lifting ropes attached to the net.
- If ropes leading to the bottom ropes are installed, it is recommended to lift/lower the net by pulling these ropes.
- All lifting of the net must be done in a way that does not increase the strain on the netting. Lifting by the netting itself must not occur.
- Installation and removal of the net must be carried out in a controlled manner, using lifting equipment of the appropriate size for the net to prevent damage.
- The replacement and installation of nets should take place under favorable weather conditions, considering wind, current, and wave height.
6.6 Biofouling
Biofouling adds extra weight to the net, and in extreme cases this can cause damage. Significant biofouling also reduces water flow through the net, decreasing oxygen supply to the fish. The farmer must have procedures in place for monitoring and documenting the biofouling status.
Biofouling must be removed in a way that does not damage the net. If a fouled net has areas without biofouling, these areas should be inspected carefully, as they may indicate that the net has been exposed to something that scraped off the biofouling.
6.7 Cleaning in water
When cleaning the net in water, care must be taken to avoid causing damage.
We recommend manually raising and lowering the cleaning equipment, or ensuring that mechanical equipment has adequate lifting force limitations to avoid damaging the net if the equipment gets stuck.
6.8 Handling of net and weights
The lifting and lowering of weights/tensioning systems must be done in a way that avoids contact with the net or point loads exceeding the capacity of the attachment points.
- The net should be lifted in a way that prevents uneven loads on the netting.
- Lifting and lowering of the net must be carried out by using the loops on the lifting ropes.
- When ropes leading to the tensioning system are installed, it is recommended to lift/lower the net by pulling the tensioning system ropes. All lifting of the net must be done in a way that does not increase strain on the netting. Lifting by the netting itself must not occur.
6.9 Lifting the net
When lifting the net with sinker tube system without winches installed on the pen, the sinker tube should be raised in multiple stages of maximum 8 m around the entire pen.
- Current conditions must be taken into account when raising the sinker tube.
- Slack lines should be rolled up for each stage and haul ropes must be tightened.
- Stop lifting when the sinker tube is 1 m below the floating collar.
- If the net is to remain rolled up for an extended period (overnight or longer), the weight should rest on the floating collar and main vertical ropes, not on the handrails/hooks or the netting.
- In bad weather, the net and sinker tube should be lowered to the operating position.
- Slack lines should be attached to hooks to prevent fish from being caught in folds in the net. One or two meshes should be lifted at a time.
- There should be no tension on netting hanging from the hooks.
6.9.1 Lifting with Midgard Winch System
If the pen has the Midgard Winch System installed, the net is lifted by using all winches simultaneously to ensure even load distribution around the pen. See separate user manual for Midgard Winch System (only in Norwegian).
7 Inspection and maintenance
Under normal operation, regular inspection of ScaleAQ net must be carried out. The inspection intervals described in Table 5 in chapter 7.2 are minimum requirements from ScaleAQ AS.
7.1 Competence requirements
Inspection of nets at sea must be conducted by personnel with thorough knowledge of nets and the associated risk factors. Critical execution aspects and inspection areas must be reviewed in a Safe Job Analysis (SJA).
7.2 Inspection and maintenance for nets in operation
All inspections must be documented and stored together with other documentation for the specific net.
| Area | Method | Description of inspection | Weekly | Every 3 months |
| Primary attachment of net to pen | Visual | -Is there any friction or wear on the attachment rope? -Is there any friction or wear on the primary attachment (Midgard-suspension) on the net? | X | |
| Top rope / jump net | Visual | -Does the top of the net have some slack to prevent it to be subjected to anly loads? -Are the visible parts of the net above and below water evenly and properly suspended and stretched out, free from visible damage to the netting and ropes? | X | |
| Secondary attachment of net to pen | Visual | -Is there any friction of wear on the main rope or netting? | X | |
| Openings in jump net | Visual | -Is there any friction of wear on or around the jump net openings? | X | |
| Fouling | Visual | -Evaluation of fouling on the net. Is it necessary with any actions, such as washing or change of net? | X | |
| Hauling rope and hoisting rope | Visual | -Are all hauling ropes and hoisting ropes securely attached to the floating collar without any loads? | X | |
| Extra equipment | Visual | -Are extra equipment related to the pen securely attached to prevent them from falling into the net and do any damage? | X | |
| Predator | Visual | -Are there any visible damages on the net that can be caused by predators? | X | |
| Net | ROV | -Is the net evenly and properly suspended in all sides and bottom? -Are all ropes and netting without any visible holes or damages? | X | |
| Attachment spreading system | ROV | -Does the spreading system have sufficient distance to the net to prevent any physical contact with the net? -Is there any friction or wear on the attachment of the stretching system? | X | |
| Sinker rope / suspension for spreading system | ROV | -Are there visible signs of friction or wear in the areas of the sinker ropes? | X | |
| Dead fish handling system | ROV | -Is there any friction or wear in the area around the dead fish handling system and is it functioning as expected? | X | |
| Other | Visual | Is there any driftwood or other elements that can cause any damage to the net? | X |
7.3 Event-based inspection
Inspection should be conducted after the following events:
- After installation of the net, including the suspension system/weights and dead fish collection system.
- After lifting of the net, for example during operations.
- After working with the dead fish collection system.
- After storms or other extreme stresses on the net. This must be assessed by the operator for every case.
- Following other incidents that may have caused damage to the net.
The inspection areas in case of any of the events above are described in Table 6.
| Area | Description of inspection |
| Main attachment net – floating collar | The main attachment points between the net and the floating collar are the Midgard-suspension points. They are designed to absorb the loads from the weighting system and the rest of the net. -Is the net correctly attached to the pen? -Are the corners of the net correctly positioned relative to the design of the floating collar? -Is the net attached according to the user manual? |
| Top rope / jump net | -Is the top of the net keeping some slack when it is suspended to ensure it is not absorbing any loads? -Are the visible parts of the net above and below the surface evenly suspended and stretched, without any visible damages to the netting and ropes? |
| Hauling rope and hoisting rope | Are all hauling ropes and hoisting ropes securely attached to the floating collar without any loads? |
| Secondary attachment of net to pen | -Is the secondary attachment of the net keeping lower breaking strength than the main rope? -Is there slack or no strain on the secondary attachment? -Has any tear or wear occurred to the main rope or netting? |
| Connections in the jump net | Are rope connections in jump net securely attached according to the user manual from net supplier? |
| Extra equipment on and connected to floating collar | Is all extra equipment on and connected to floating collar securely attached to prevent it from falling into the net or causing any damage to the net in other ways? |
| Attachment of spreading system | -Is the spreading system correctly attached to connection point on the bottom rope (intersection between the lifting rope and the bottom rope)? -Is the spreading system only attached to the connection point on the bottom rope (intersection between the lifting rope and the bottom rope)? -Does the spreading system have sufficient distance to the net to prevent any contact with the net? |
| Net | Is the net evenly and properly stretched in all sides and in the bottom? |
| Hauling rope | Is the hauling rope correctly attached? Does the hauling rope have sufficient slack and is attached in a way that prevents any wear or damage to the net? |
| Dead fish net | Is the dead fish net correctly mounted and sufficiently weighted for functioning as it is supposed to? |
| Suspension for spreading system | Is the suspension for any spreading system correctly installed according to the user manual from the supplier and positioned in a way preventing it from causing any wear and tear to the net? |
7.4 Inspection and maintenance at service stations
- Net repairs should only be carried out by service stations with approved competence per NS 9415:2021, section 10.3.8. Changes, modifications, expansions, or similar adjustments to net should be done in consultation with ScaleAQ. The service station performing the work must ensure compliance with NS 9415:2021 and is responsible for documenting the changes.
- Nets that do not meet the remaining strength requirements for netting after service must not be used for fish farming.
7.5 Repairs of nets at sea
All damages and holes in nets must be repaired immediately upon observation to prevent escape.
7.5.1 Temporary repairs at sea
In the event of critical incidents involving holes in the net and the risk of escape, and when a ScaleAQ repair kit and personnel with expertise in repair work are unavailable, a temporary repair may be carried out by the fish farmer to seal the hole in the net and prevent escape. To continue operations with a damaged net and maintain the validity period of the net service card, the temporary repair can be improved in accordance with permanent repair procedures at sea.
7.5.2 Permanent repairs at sea
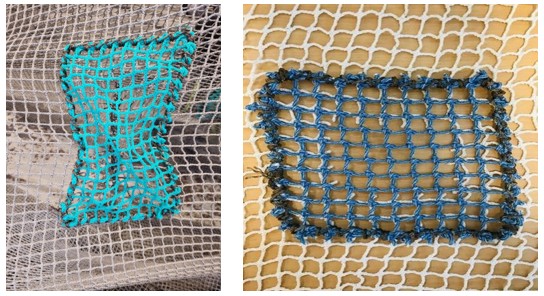
To continue operations and maintain the validity period of the net service card after incidents involving holes, a permanent repair must be carried out at sea in accordance with the ScaleAQ repair kit and the procedure below. The permanent repair must be performed by personnel with documented competence in this type of repair work, such as personnel from a service station or a certified diving company. The fish farmer may carry out repairs on minor tears in the netting, provided they do not exceed a maximum width of two meshes.
Following procedures must be conducted for permanent repair of net at sea:
- The damage in the net must be documented with photos.
- If there is uncertainty about the repair method or whether the fish farmer can carry out the repair themselves, a Certified Service Provider must be contacted and a photo must be sent for consultation.
- If the fish farmer performs the repair, the ScaleAQ repair kit with approved patching thread or equipment equivalent to the repair kit must be used, ensuring that the patching thread has equal or higher breaking strength than the netting.
- The repair procedure must follow the procedure described in the appendix for net repairs at sea in this user manual.
- The completed repair must be documented with photos.
- An email with a photo of the damage, the breaking strength of the patching thread (if the repair kit was not used), and a photo of the completed repair must be sent to the Certified Service Provider for approval of the repair.
- If the repair is approved, the Certified Service Provider will certify the net for continued operation within the valid service period according to the service card.
- The fish farmer must log the repair in their system, ensuring that the record follows the net for future service.
7.5.3 Repair of rope connections
In the event of damage to rope connections requiring repair on a net in operation, ScaleAQ must be contacted for assistance and review of repair methods. The rope connections in the net vary depending on the specific nodes and must therefore be assessed on a case-by-case basis.
8 Transport and storage
8.1 Receiving and unpacking of the net
Upon delivery of the net by the carrier, the packaging must be inspected for holes or damage. If the packaging is damaged, this may indicate that the net has also been damaged during transport. Minor repairs, such as fixing torn meshes, must be carried out in a practical and safe manner. For any damage beyond torn meshes, the supplier or service station must be contacted.
Unpacking of nets should ideally occur as close to installation as possible; the net should preferably be taken directly from its original packaging at installation. If the net has been unpacked, it must be transported securely. After that, handling of the net should be minimized prior to installation.
8.2 Handling during loading and unloading
Only approved and certified lifting equipment must be used for loading/unloading net from trucks or boats. Loading and unloading must be done carefully to prevent damage to the net or its packaging. Nets with packaging must NOT be dragged along the ground. If the packaging is undamaged upon reception, the farmer should not unpack the net for further internal transport or storage. Do not use a slip knot or snare rope for lifting the net.
8.3 Moving of nets

If the fish farming facility is to be relocated with the net attached to the floating collar, the towing must be carried out with great caution. The towing operation must be risk-assessed by the operator in consultation with the operator and ScaleAQ.
8.4 Storage of nets

- Although the materials are stabilized against ultraviolet (UV) light, nets must not be stored in direct sunlight for extended periods.
- The materials used in nets and ropes are sensitive to compression, abrasion, cutting, or scraping against sharp edges and rough surfaces.
- The materials in nets are easily damaged by heat and must be kept away from welding flames or similar heat sources.
- Note: Nets must not be exposed to formic acid, caustic soda, or other chemicals that could damage the netting or ropes.
- The storage area and stored nets must be secured against attacks from pests and similar threats.
9 Manufacturer and product identification
For questions regarding nets, inspection and maintenance, contact our headquarters or the nearest service department.
| HEAD OFFICE | |
| Scale Aquaculture AS | Phone: +47 73 80 99 30 |
| Beddingen 16 | E-mail: post@scaleaq.com |
| 7042 Trondheim | www.scaleaq.no |
| HITRA – Net service | |
| Stasjonsveien 22 | |
| 7250 Melandsjø | Phone: 72 44 61 41 |
| Contact info nets: | notposer@scaleaq.com |
9.1 Documentation
Nets from ScaleAQ have a product certificate with information about dimensional class, validity period and details about the net and the materials it is made of. The product certificate must be available at the company keeping the aquaculture permission. See example in appendix 1.
9.2 Identification of net
Each net has an unique production number identifying the net. All production-related information including service history is registered and stored with reference to the production number. Each net is equipped with 5 identification tags, with 4 evenly distributed along the top rope and the 5th located at the bottom cone of the net.
The identification tags include the following information: Manufacturer, production year, production number, dimensional class, net circumference and depth, as well as the type of netting and mesh size.

9.3 Validity period

ScaleAQ Nets can not be used for farming of fish without valid documentation.
The net has a designed service life of 36 months, afterwards it can continue to be used provided it is documented that inspection and repair requirements have been met and that the net complies with the requirements of NS9415:2021. The validity period of the product certificate begins when the net is deployed in the water, but no later than 12 months after the date for issuing the certificate. After 24 months, the net must have a valid service card as an attachment. A service card can extend the net’s validity period by maximum 24 months, provided that the residual strength and general condition meet the requirements of NS9415:2021.
9.4 Service log
A service card can only be issued by a certified service station. ScaleAQ service departments are certified as service stations in accordance with NS 9415:2021. Refer to NS 9415:2021 for detailed requirements regarding the validity period and potential extensions of such validity.
9.5 Modifications
All changes, modifications and extensions of nets must take place in consultation with ScaleAQ. This ensures valid product certificate, and that the net is designed and documented in accordance with NS9415:2021. For modifications to rope terminations and connection points in the net, ScaleAQ must be contacted for correct procedures.
In case of modifications to the net, the product certificate must be revised by ScaleAQ. Marking of the net must also be updated by ScaleAQ.
9.6 Deviations and error handling

In case of deviations, errors or shortages related to the net, ScaleAQ must be contacted by the contact info listed in Table 7.
10 Revision history
| Rev. | Changes | Date |
| 1 | The user manual is revised to comply with the regulations in NS 9415: 2021. | Apr. 10, 2025 |
| 2 | Chapter 4.5 Attachment of net to sinker tube has updates related to min/max lengths of sinker tube attachment ropes and attachment to Hs3+ connection point. | Sep. 15, 2025 |
11 References
| /1/ | NYTEK23 |
| /2/ | NS9415:2021 |
| /3/ | Institute of Marine Research – “Undersøkelse av maskeåpning og smoltstørrelse” – Report No 22-2013. |